Have you ever had a photo that looks great, but the background just doesn’t work? You’re not alone. Whether you’re trying to make a photo fit into a theme or you want to replace an old background with something more up-to-date, there are plenty of reasons why someone might want to know how to remove a background in Photoshop.
The good news is that replacing or removing a background can be done pretty quickly if you have the right tools for the job, or when you hire one of the many reliable freelance background removal services found on Guru!
For now, though, here’s how to replace a background using Photoshop:
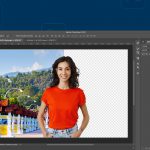
Step 1: Open Your Image in Photoshop
Open the image that needs the background replaced. You can do this by going to the ‘File’ menu at the top of the screen and choosing ‘Open.’
This will bring up a standard file browser window where you can browse for the image you want to edit. Once you’ve found it, click ‘Open.’ Photoshop will bring up the image for editing.
Step 2: Choose a Selection Tool
Now that you have your image open in Photoshop, it’s time to choose a selection tool that will allow you to manipulate the background around the subject of the image. There are several different tools you can use for this purpose, but we recommend using one of these three:
- The Magic Wand Tool: This tool is great for selecting areas that are uniform in color or tone. It can also be used to select areas based on contrast (as long as there is some contrast between your subject and its background).
- The Lasso Tool: This tool allows you to draw freehand selections with straight lines or curves. If there are multiple areas in your image that need to be selected individually, this is often the best tool for the job.
- The Pen Tool: This tool allows you to create a path using anchor points and straight lines or curves. You can also use it to create a path around an area whose shape isn’t obvious at first glance, such as around a person’s hairline.
Step 3: Add a Layer Mask
Once you’ve finished your selection, you’ll want to add a layer mask. This allows you to hide the background and replace it with something else.
To do this, go to the ‘Layer’ menu (or use the keyboard shortcut ‘Ctrl+Shift+N’) and select ‘Layer Mask.’ Click the small circle at the bottom of the Layers palette and select the ‘Add Layer Mask’ button to place the selection on the layer.
Now, you’re going to make a new layer and add some content for the new background. You do this by selecting colors for the image using the Color Range option or the shortcut ‘Ctrl/Cmd + Shift + G.’
Step 4: Refine Your Selection
The final step to replacing your background is to refine the selection. At this stage, there should be a seamless transition between your subject and the new background.
If there are any areas that look as though they don’t belong, you can use the Refine Edge tool (‘Ctrl/Cmd+R’) to make adjustments. This tool will allow you to choose between different options—Smooth, Feather, Contrast Edge, and Shift Edge—to refine your selection.
Because the options for refining require skills, it’s better to hire a freelancer to do this if you want to get the best results.
Why Hiring a Freelancer for Background Replacement Is Better
The steps described above will help you only with basic background replacement. When it comes to advanced background replacement, you need to know how to give an image a transparent background, which can be one of the most challenging tasks in Photoshop.
Replacing a background requires a wide range of skills and tools, including masking and selection techniques, advanced blending modes, the ability to work with multiple layers at once, and more. If you’re not familiar with Photoshop or don’t have much time to spare, it can be difficult to learn these techniques on your own.
If you want professional-grade results for your image, hiring a freelancer can make all the difference, due to:
- Personal touch: Freelancers are invested in their clients’ projects because their reputation is on the line. They will go the extra mile to ensure their client is happy with the results by adding a personal touch to their work. This can lead to a better end product.
- Turnaround times will be faster than ever before: Freelancers are skilled at working quickly, so your photos look great even when deadlines are tight. This is especially useful when you need bulk editing, which will take a lot of time and effort if you are a beginner in Photoshop and try to do it yourself.
- Remote working: Freelancers often work remotely and can be hired from anywhere in the world. This can help you to find the best talent for your project, regardless of location.
In Summary
Replacing the background using Photoshop is more common than you might think, but it does require some solid skills with the software. If you are proficient at Photoshop, you can give it a shot on your own–but if you want a professional job done quickly, visit Guru to find a skilled and experienced freelancer who can get the edit done for a reasonable rate!